
| Back to Library page Page 1 - Page 2 - Page 3 - Page 4 - Page 5 - Page 6 - Page 7 |
Filter Cap InfoGo to this page for info on capacitors wired in series and parallel. |
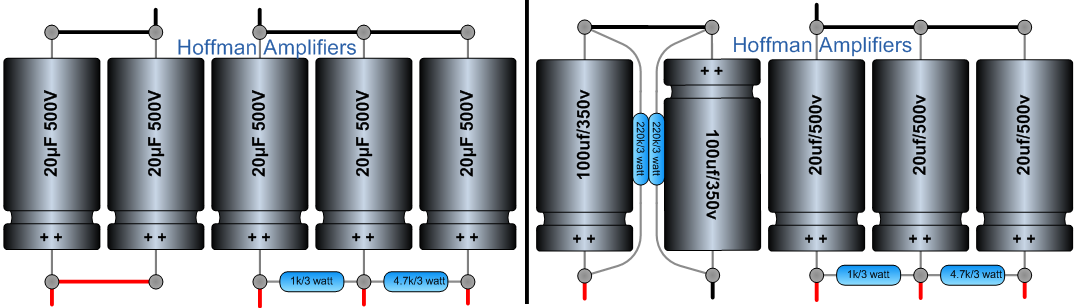 |
| Left: 5 caps of the same value Right: 2 x 100/350v and 3 x 20/500v |
| There are a several filter cap arrangements found in Fenders. I have shown the two most common layouts in the diagrams above. There is usually a rectangular
shaped metal can on the outside of the chassis. The filter caps are inside this can. Fenders from the 1950's had the negative cap leads soldered right to the metal can and there
is not a circuit board inside the can. Later Fender's had a small circuit board under the can and the filter caps are soldered to the circuit board. There are two or more common
ground busses on the negative ends of the caps. There are several other filter cap arrangements you will run into but all of them are variations of the two layouts above. Some early sixties Fenders have more than 5 filter caps and mixed values for the caps. Some later silver face Fender's have one of the bias caps inside the can with the filter caps. Make a diagram of the filter cap board before you remove them so you get the new ones back into the same place and all facing the correct way. Replace all the filter caps and the power supply resistors that go between the filter caps. Leave any 220K 1 watt resistors alone. The 220k resistors are rarely bad. See photo on the left above: The first scenario is 5 filter caps that are all the same value and the positives are all facing the same direction. The first two 20/500v caps on the left in the photo above are wired in parallel to get a 40uf rating at 500 volts. These two caps are the first filter caps downstream from the rectifier in the power supply. All 5 caps are usually 20uf/500v caps or 16uf/475v caps. See photo on the right above: The second most common scenario is two large 70uf, 80uf or 100uf filter caps that are wired in series. The 100/350v caps are wired in series to get a higher voltage rating. Two 100uf/350 volt caps wired in series gives you a 700 volt rating and 50uf of capacitance. These two 100/350v caps are the first filter caps downstream from the rectifier in the power supply. The old 70uf and 80uf caps are all replaced by the 100uf/350v caps these days. There will be two 220K 1 watt bleeder resistors between the 100uf/350v caps. Leave these resistors alone, they do not need to be replaced. They do not get hot and they do not see any hard duty. The last 3 caps on the right are usually 20uf/500v caps with the positives all facing the same direction. On the positive ends of the last 3 caps on the right you will usually see some 1 watt carbon resistors that go between the leads. These are the power supply resistors and they usually need to be changed. There are two of these resistors between the 3 x 20uf/500v caps in the photo's above. Replace these 1 watt carbon resistors with a 3 watt metal film resistor for long term reliability. Some amps will have more than two of these power supply resistors. If there are more than 5 caps in the can, there will be more than two of these power supply resistors. |
| Page 1 - Page 2 - Page 3 - Page 4 - Page 5 - Page 6 - Page 7 |
Enter My Tube Amp Parts Store Here
Mobile users Enter My Tube Amp Parts Store Here
The Tube amp Library of information
Click the link above for Tube amp info, Schematics, Board building information, Projects, Mods, Transformer diagrams, Photo's, Sound clips.
There are hundreds of pages of Tube amp information on my library page.
Please visit my Tube Amplifier Forum
Here's the place you can go to ask tube amplifier questions.
You will find a large community of friendly amp builders at the link above.
Check the huge library of Schematics here
Design your own custom Turret Board or Eyelet board
DIY Layout Creator file analyzer program
DIY Layout Creator file library
How to email me
|
MEMBER OF PROJECT HONEY POT Spam Harvester Protection Network provided by Unspam |