|
|
|
|
|
|
|
|
|||
|
|
 Cave
CaveHome |
 Cave
CaveEquipment |
Slideshow TutorialStep 2: iPhoto Setup & WalkthroughOnce you have your images in iPhoto, and your music/audio in iTunes, you can now create your slideshow. From within iPhoto, first select all the photos you would like to have included in your slideshow (to select your photos, you can click-drag a box around them, or you can click each one while holding the apple key). Do not worry about the order you select them, you can adjust the order later. After your photos are selected, click the "Slideshow" button down towards the bottom of the iPhoto window. Use the image below as a guide 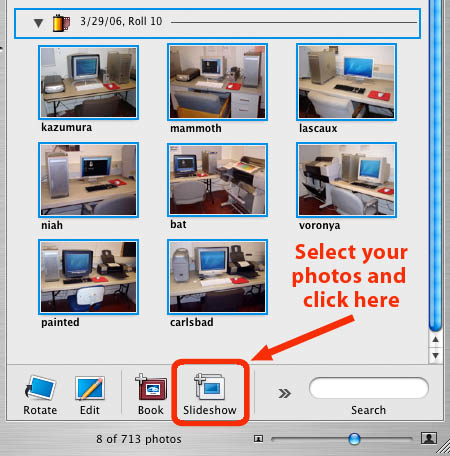
After clicking the "slideshow" button, the iPhoto window will shift to a new view, and you will notice a new item for your slideshow is created in the left menu bar. The photos you selected for your slideshow will be visible in the top pane of the window. The lower pane of the window will show you a larger preview of the photo that is currently selected. 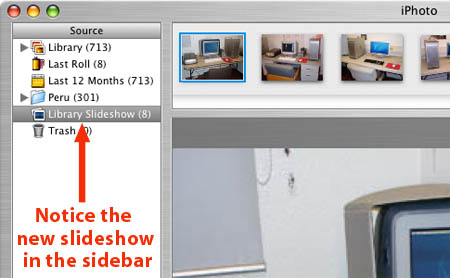
Below the large preview, you will see the slideshow editing controls. Some of these slideshow controls are self explanatory, while others are not so intuitive. 

Here is a quick rundown of what the different buttons do: PLAYClicking the play button will play your entire slideshow, fullscreen, with all the photos in your slideshow, using all the current settings. The slideshow will play in the order the photos appear in the top window pane (left to right). You can click-drag your photos in the top window pane to rearrange the order of them in the slideshow. PREVIEWIf you want to quickly see what a transition looks like between two photos in your slideshow, use the preview button. Navigate through your photos in the top window pane and select the two (adjacent) photos you want to test. After clicking on Preview, iPhoto will show you two slides worth of your slideshow, using the photo you selected and the next one after that (remember, the order your slideshow plays is from left to right in the top window pane). EFFECT/TRANSITIONThe "Effect" menu lets you quickly set your photos to black and white or sepia tone. Note that when you choose an effect, the effect is applied only to the selected photo(s). So, if you wanted to make all your photos appear as black and white, first press "apple-A" or go up to "Edit--->Select All," and then choose Black and White from the Effect menu. The Transition menu works very similarly. The transition you apply to the currently selected photo will determine how that photo transitions into the next photo in the slideshow. You can apply the same transition to multiple photos, you just need to choose which photos you want in the top window pane (or as mentioned, "apple-A" to select all your slideshow photos). KEN BURNS EFFECTThis is a means to control the "Ken Burns Effect" on a per-slide basis (normally, the K.B. effect is globally enabled for all the photos in your slideshow; more info later under the "Settings" section). This effect is named for the documentary filmmaker Ken Burns, who pioneered a new technique of telling stories with photographs. The idea is to take a still image and add drama to it by zooming in, or zooming out, on the image. Unfortunately, iPhoto doesn't let you choose which part of the photo you want to zoom in on, so this effect is less useful than you might think. ADJUSTThe "Adjust" button will allow you to set the individual timings of each photo in your slideshow. When you click on Adjust, you get a small window which lets you set the duration that the photo will be on the screen (how many seconds), and also which transition you want (redundant with the "Effect/Transition" controls) SETTINGSClicking this button will open a new window with many options for global slideshow controls. That is to say, the settings in this window apply to your slideshow as a whole. For example, this is a good place to go if/when you want to disable the Ken Burns effect, just uncheck the box next to "Automatic Ken Burns effect." Another popular option is the "Fit slideshow to music" option. This is very helpful if you want to play your slideshow to match the duration of your music. iPhoto will look at the length of your chosen song(s), and the number of photos in your slideshow, and it will automatically calculate the correct duration of each photo, so the length of your slideshow will fit exactly to the duration of your music. MUSICWhen you're ready to choose the song(s) you want for your slideshow (or if you want to disable the music feature in iPhoto), click the Music button to choose the appropriate settings. If you want to turn off the music in iPhoto (it's turned on by default), uncheck the box next to "Play music during slideshow." If you do want to have music/audio for your slideshow, click on "Library" to view and choose your song(s) or audio file(s) in your iTunes music library (if you haven't put your songs/audio into the iTunes music library, go back to the first step in this tutorial for help importing your files). |
|
|||||
|
|
 Managing
Color |
 Tips &
Tutorials |
|||||||
|
|
 FAQ
FAQ |
 Cave
CaveRules |
|||||||
|
|
 Glossary
 |
 Send
SendMessage |
|||||||
|
|
 Art
ArtHome |
 UCSC
UCSCHome |
|||||||
|
|
|||||||||

