|
|
|
|
|
|
|
|
|||
|
|
 Cave
CaveHome |
 Cave
CaveEquipment |
Cave Printing TutorialStep 6: Print Your ImageAt this point you should be ready to print your image. Before printing, you should make sure your image is saved with all of your most recent work accounted for. It's also a good idea to save a separate "print" copy of your image with all of your layers flattened (flattening the layers in your image will reduce the file size and therefore speed up your print times; this is accomplished with "Layer--->Flatten Image"). The actual printing process involves two major steps. First you will tackle the "Print with Preview" window, and immediately after that you will navigate the "Epson Print Dialog." To get started, go up to the menu bar and choose "File--->Print with Preview..." You will see a window similar to this one: (Click here to see a full resolution version of this image) 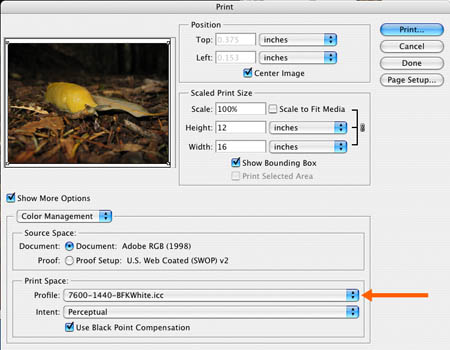
Although the "Print with Preview" window has a lot of options and buttons, the truth of the matter is that many of these controls, if left on their default settings, will usually produce adequate results. However, there are two very important features to check in this window. First of all, take a look at the mini-preview window in the upper left part of the screen. Make sure your image looks oriented correctly in relation to the paper. If you only see a part of your image, or if you just see a big blob of pixels, you will need to go back to "Image Size" and "Page Setup" to make sure your settings are working in harmony. The second vital option in "Print with Preview" is under "Print Space," you will need to choose a profile for the paper you are printing on. Click on the menu next to "Profile" and make a selection from the list. In our example, we're printing on Rives BFK White paper, so from the list we choose "7600-1440-BFKWhite.icc" because we are printing on a 7600 printer, at 1440 DPI, on "BFK White" paper (NOTE: it is entirely possible that the paper you are using does not have a profile for it. If this is the case, then you should experiment with one or some of the profiles in the list, or speak to the IT Coordinator about how to get a profile for your paper.) After you have made your paper profile selection, click the blue "Print..." button to proceed. You are now at the second and final stage in the printing process, the Epson Print Dialog. You should now be looking at a window similar to this one: 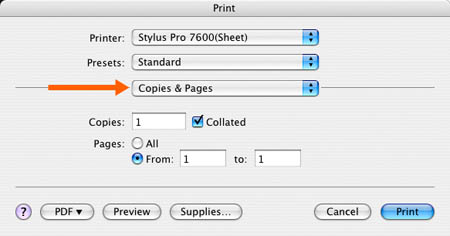
Click where it says "Copies and Pages," as indicated by the red arrow above. You will see a menu with many options. Select where it says "Print Settings." Your window should now look like this: (Click here to see a full resolution version of this image) 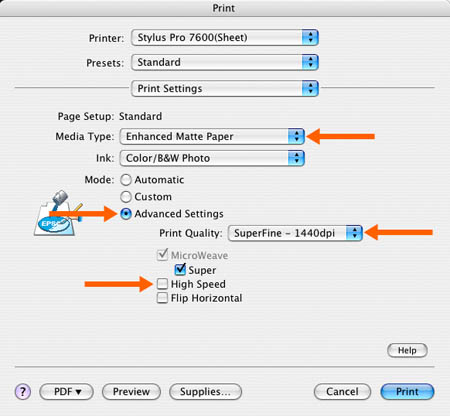
The four red arrows above show you the important options in this window. Make sure you choose "Advanced Settings" and "1440 DPI" (a.k.a. "Best"), and make sure you turn off the "High Speed" option. For "Media Type," please see the glossary section on media types. Go back to the menu you started with, where it currently says "Print Settings," and choose "Color Management" from the list. Your window should now look like this: 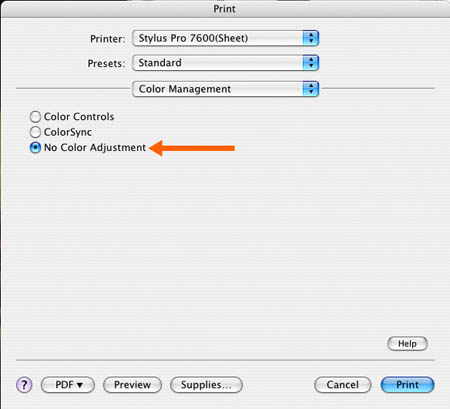
All you have to do for this window is make sure "No Color Adjustment" is selected. If you choose anything other than "No Color Adjustment," you will be "double color managing" your print job, and you will not like the results. Congratulations, you're all done!! Click the blue "Print" button to start your print job. When it's done printing, give it a few minutes to dry before you start making any color decisions. |
|
|||||
|
|
 Managing
Color |
 Tips &
Tutorials |
|||||||
|
|
 FAQ
FAQ |
 Cave
CaveRules |
|||||||
|
|
 Glossary
 |
 Send
SendMessage |
|||||||
|
|
 Art
ArtHome |
 UCSC
UCSCHome |
|||||||
|
|
|||||||||
