
Krsna Kirtana Songs
est. 2001 www.kksongs.org
Home à Music Center à Instrumental Guides à Tabla Guide
Chapter 01: Introduction to the Tabla
Dear student: In this online guide, there will be three
characters whom should be great friends by the end of this chapter. They are
instructor, student, and the tabla. You, the student,
and I, your guide, can know more of each other later. I’ll introduce you to the
tabla, whom you’ll do most your practice, work, and
creations on. The tabla is our focal point in this
course. Material shown here will be helpful, but not necessarily a replacement
course in pakhawaj, khol,
or any other percussion instrument.
The origin of the tabla is
the most debated topic. It is argued to have appeared at least five hundred
years ago. Some musicians will argue that tabla was
derived from dividing the ancient barrel drum, pakhawaj,
into two segments which became the two drums of the tabla.
This is shown in Figure 1.1. Another famous theory suggests that the two drums
evolved separately. Some other speculations show that the tabla
was of Persian origin from either the nebla drums or the Arabian tabla drums.
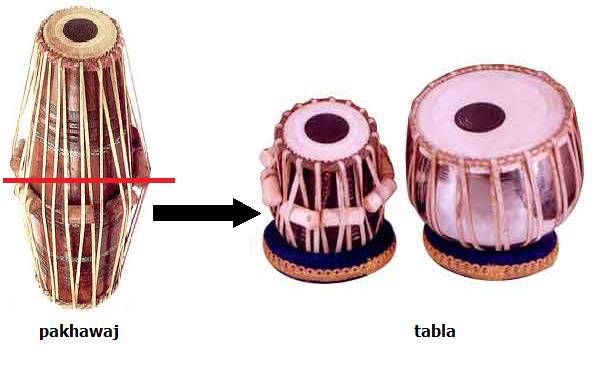
Figure 1.1
Although the origin is unknown, the tabla has found its way into accompanying classical music
of
The tabla is simply
a pair of two kettledrums from
The smaller treble drum is known as the daya. This comes
from the Hindi word for “right.” Naturally, if you are a right handed person,
you will play the daya with your right hand. Other
courses might refer this drum as the danya, and “tabla”. I avoid
using this word, as the word alone is prone confusion. In this book, daya or dayan means “smaller
drum” and “tabla” means the pair of both drums. The
body of the dayan is made of
wood. The shell is known as the lakadi.
The bigger bass drum is known as the baya which means
“left” in Hindi. If you are a right-handed person, you will play the baya with your left. Other books and teachers will refer to
this drum as the banya, dagga, or the duggi. I will use baya or bayan as the “bigger bass drum.”
The body of the baya is made of copper, nickel,
aluminum or rarely clay, fiberglass, or wood. The shell is known as the pital.
The drum head is known as the “puri.” On each puri, there are three layers.
The outer rim is known as the kinnar. The middle layer of goat-skin is known as the maidan, and the
black iron layer is known as the syahi. It is also known as the shahi, or gob. You will notice on the baya that the
syahi is off-center, unlike the dayan, whose syahi is in
the center. The explanation will be more evident in the future chapters.
The outer rim of braid, right outside the playable
portion, is known as the gajara. This is used for tuning with your tuning hammer. You
will not nor should not attempt tuning tabla.
Incorrect hammering of the gajara can warp the sound
of your tabla and destroy your puri.
Tuning will be taught in Chapter 34.
The lacing “straps” are known as “tasma.” More expensive tabla
use leather rawhide for tasma, while older and
cheaper tabla uses rope. Currently, in order to avoid
tuning and re-heading problems, bolt-tuned tabla is
used. I personally think this is a better option to get, but it is a good idea
to consult your teacher first.
To tighten your tabla,
there are wooden blocks called gatta. There are always found on the dayan drums. Occasionally, gatta
are inserted in the bayan to tighten it.
Lastly, cushions known as chutti, help elevate the drums to allow the maximum amount of
sound to resonate.
Here is a picture of the tabla
with labels in Figure 1.2.

Figure 1.2
When learning tabla, it is
very beneficial to practice and perform sitting on the ground in the Indian
“yoga” position. This will allow maximum energy on the tabla.
Very rarely is tabla ever played on tables, while
sitting on a chair. It is usually the least recommended posture. Some ashrams
and some players will play the baya on the ground,
while they keep the dayan on
the lap, considering the lap as the cushion. This might be pleasing, but it
might become very tiring after hours of playing. In addition, it adds greater
strain to the hand with the dayan
hand.
As you have seen these pictures of the tabla pair, they are always on an angle. For now, you do
not have to play on an angle. In fact, it is very recommended that you have
them leveled to the ground. This way, you can see exactly where you are
hitting. It is analogous to a piano player looking at the keys, initially.
Through years of practice, speed and striking judgments will come very
naturally that one does not need to look at the keys. Similarly, later on, for
speed and comfort, you can tilt your daya and baya away from you. It is a common practice to have the daya and baya facing away from
the player, while the baya and the daya are slightly looking at each other.
Get some time with your tabla.
Look and feel it to get an idea what it sounds like. Without learning any tabla information, your first assignment is to strike the daya using your index finger. What sound is produced? Do
you have a long resonant sound? Do you have a stiff nonresonant
sound? Is it partially resonant? Work for the resonant sound. This is very
difficult for beginners who have not dealt with Indian instruments. On the
other hand, for mridanga players, this concept should
be of no difficulty. Keep trying to strike the daya
using your index finger and aim to get that open resonant sound. Until you can
do this without difficulty, do not move onto Chapter 2. Every chapter onwards
relies on your ability to strike the daya, as well as
baya, to produce an open resonant sound.
UPDATED: June 20, 2009