
My Triple SSC P7 LED Bike Light |
|
 This is my Triple SSC P7 experiment I decided to give it a go because I thought about it and it seemed like it would be a fun project. Normally I only like little small round lights, but I think I can get used to this after seeing how bright it is. I only plan on using this light on the fast mountain descents here in NC, USA The light only gets turned on at the top of the climbs and off at the bottom I use a single Marwi P7 on my helmet set to low for all the climbs I don't much light for long mountain climbs I need as much light as I can get for the descents. I was using two of the Marwi P7's on my bars, and I only used them when I descended I don't need multiple light output settings for how I use my handle bar lights. This thing only gets turned on when I need tons of light I experimented with using a fancy switch and 6 of the 1400ma 7135 chip current limiter boards It ended up being way too complicated and I was not able to get any where near the 8400 milliamps total current that I would like to get So I got rid of all the electronics and hot wired all 3 P7's direct to a 3.6 volt 6x18650 battery pack The current topped out at 7500 milliamps which is 2500 milliamps per P7 That amount of current is just fine for each P7 Without any current regulation, the direct drive works just fine. I plan on running it on a 3.6 volt 6 x 18650 14,400 mah battery pack I already have The switch is a simple SPST 14amp Judco switch as used on the old Marwi halogen lights It's basically just Off and On The light weighs 241 grams, which is lighter than 3 of my Marwi P7's lights Beam shots of my Triple P7 light Wait for the animation to load and then it will play in a loop Beam shot animation |
|
| - | |
| Click on Image below for a larger Image | |
 |
 |
|
The shell of the light started life as a flat piece of 6061 aluminum .125" thick x 10.25 inches long x 1.875 inches wide I milled the fins and other areas on my CNC machine There are half lap joints at each end The edges are milled so that the front lens and rear cover sit down into the body The idea was that if I milled the fins .062 inches deep, that was half the thickness of the metal. Being thinner, it would then be much easier to bend the flat piece into the final shape |
|
| - | |
| Click on Image below for a larger Image | |
 |
 |
|
I milled out this block of wood so that I could wrap the skin around it to get the basic shell shape It's actually 3 pieces of particle board shelving glued and screwed together to make one big block |
|
| - | |
| Click on Image below for a larger Image | |
 |
 |
|
Here's the side view and top view of the shell after it was bent This was actually a lot harder to bend than I thought it would be I had to take a torch and heat the metal to get it to bend properly. It was only .062 inches thick at the bottom of the fins, but it did not want to bend very easily |
|
| - | |
| Click on Image below for a larger Image | |
 |
 |
|
The bottom view Note that the seam is actually a half lap joint |
Back cover plate |
| Click on Image below for a larger Image | |
 |
 |
|
This is the P7 heat sink plate that sits inside the shell The 3 x P7 mounting areas are recessed .0625" into the heat sink plate All 6 P7 mounting screw holes are tapped for 1/72" stainless screws The larger holes are for the Teflon wires to pass through Note that the brass L strips were just for testing purposes I milled out some nice thick .375" x .375" Aluminum brackets later You can see the L brackets further down the page |
|
| - | |
| Click on Image below for a larger Image | |
 - - |
|
|
3 x SSC P7's screwed down to the heat sink Later when I mounted them permanently, I used some thermal grease under each P7 |
|
| - | |
| Click on Image below for a larger Image | |
 |
 |
|
The front lens is .09" Lexan The 3 circles are milled .04" deep so that the reflector rims sit down inside the lens and stay put The shot on the right shows the 3 reflectors sitting down inside the lens The reflectors were glued and sealed into the Lexan circles using some clear high temp RTV silicon The whole lens was glued and sealed into the outer shell using the same RTV silicon The front lens gets sealed to the body to keep out moisture |
|
| - | |
| Click on Image below for a larger Image | |
 |
 |
|
Jump way forward in the construction process I painted it black using 1200 degree barbeque grille paint. Not sure how well it will stick to bare aluminum, but it looks good right now. The mount is a Marwi offset mount that I modified The light sits nicely over the center of my stem and the Marwi offset mount is quite rigid The shot on the left shows the Aluminum L shaped heat sink brackets I made They are drilled and tapped with 1/72 stainless screws and screwed to the heat sink and the outer shell The L brackets have thermal paste against the heat sink wall and the outer shell The brackets sink the heat to the outer shell very nicely The shell gets hot very quickly which means the brackets are doing their jobs The back cover plate has two screw holes The screws go into some 6/32 Aluminum standoffs The standoffs are secured to the LED heat sink You can see the 14 amp Judco SPST switch with a rubber boot The wiring is simple and done with 20 gauge Teflon wire |
|
| - | |
| Click on Image below for a larger Image | |
 |
 |
|
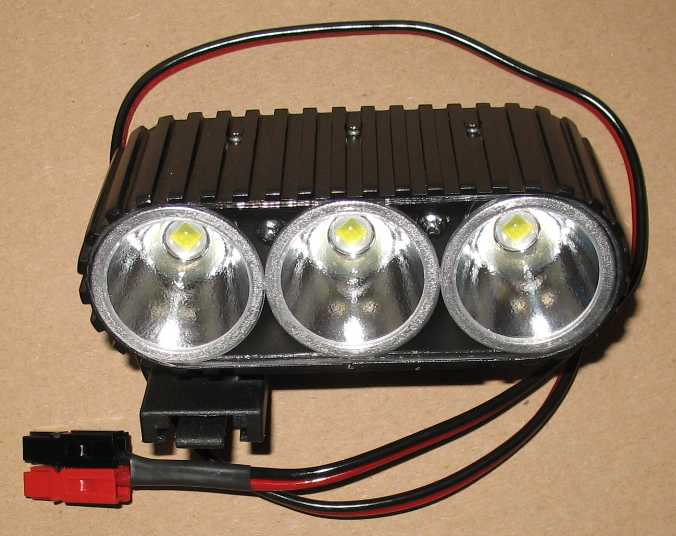
Front views - You can see the front Lexan lens, the reflectors and the P7's The handle bar mount is a New style Marwi handlebar mount |
|
| - | |
| Click on Image below for a larger Image | |
 |
 |
| Rear views - One simple SPST switch and BAM!!!!!!!!!!!! | |
| - | |
| Click on Image below for a larger Image | |
 |
 |
| - | |
Enter My Tube Amp Parts Store Here
Mobile users Enter My Tube Amp Parts Store Here
The Tube amp Library of information
Click the link above for Tube amp info, Schematics, Board building information, Projects, Mods, Transformer diagrams, Photo's, Sound clips.
There are hundreds of pages of Tube amp information on my library page.
Please visit my Tube Amplifier Forum
Here's the place you can go to ask tube amplifier questions.
You will find a large community of friendly amp builders at the link above.
Check the huge library of Schematics here
Design your own custom Turret Board or Eyelet board
DIY Layout Creator file analyzer program
DIY Layout Creator file library
How to email me
|
MEMBER OF PROJECT HONEY POT Spam Harvester Protection Network provided by Unspam |