
Programming the Behringer FCB1010 for and other info |
|
|
Back to the main Sound page I have other FCB1010 pages linked on the page above fcb1010 Uno Chip web site - Get the Uno chip here Note that the Ripwerx fcb1010 editor only works if you have the UNO chip installed Download a Ripwerx .pdf file usage document You can download the Ripwerx editor here on my web site Kemper amp forum CSV1010 program Free program that lets you edit Excel files and convert them to FCB1010 .syx files This is a Kemper stomp box .syx file you can download - Unzip it and open it in Ripwerx Kemper - FCB1010 - Ripwerx - SYSEX file link You have to prepare your FCB1010 UNO chip unit first before sending patch dumps FCB1010 Preparing for UNO usage FCB1010 Calibrate Expression pedals FCB1010 UNO 1.0.4 user guide Official Behringer documents Behringer FCB1010 manual Behringer FCB1010 Quick Start Guide Behringer FCB1010 specs Another web site with FCB1010 info Note that I only cover the Kemper browser mode in this tutorial I am using Ripwerx on a Windows 10 desktop computer |
|
Step 1: Get the UNO Chip first fcb1010 Uno Chip web site You need to have the UNO chip installed in your Behringer FCB1010 in order to do any of the programming shown on this page. The UNO chip lets you turn 5 of the FCB1010 preset pedals into stomp box pedals. If you do not have the UNO chip installed, you have 10 preset pedals and no stomp box pedals This page is only about FCB1010's that have the UNO chip installed On my FCB1010, I have set the top row of pedals to be my stomp box pedals You can also set the bottom row to be the stomp box pedals Pedals 1 to 5 are preset selection pedals on my FCB1010 Pedals 6 to 10 are stomp box pedals on my FCB1010 You can see a picture of my UNO chip FCB1010 on this page I also have the UNO4 Kemper chip in one of my FCB1010's I sort of prefer the regular UNO chip FCB1010 and the programming I am doing on this page You must calibrate the Expression pedals on your FCB1010 or they may not work correctly Look at the Behringer FCB1010 manual, page 12, section 2.9 It is not difficult to do and only takes a few minutes Note that none of this information applies to the UNO4 Kemper chip You cannot program the UNO4 Kemper chip with an editor |
|
Step 2: Get a FCB1010 editor Note that the Ripwerx fcb1010 editor only works if you have the UNO chip installed Download a Ripwerx .pdf file usage document You can download the Ripwerx editor here on my web site After you have the UNO chip installed in your FCB1010, you need an editor that lets you edit the settings using your computer. It is way easier to use an editor than to try and program the FCB1010 using the instructions in the Behringer FCB1010 manual. FCB1010 editors let you download and upload .syx files to the FCB1010 I am using the free Ripwerx editor in the screen shots below Ripwerx is a java based editor and there is nothing to install Just download the .zip file and unzip it Click on the java .jar file and Ripwerx will run It will create a .prop file that saves your Ripwerx preferences Note: You have to have Java installed on your computer to run a .jar file Here's the link to download Java for windows Java Download Link |
|
| Click on the images below for a larger image. | |
 |
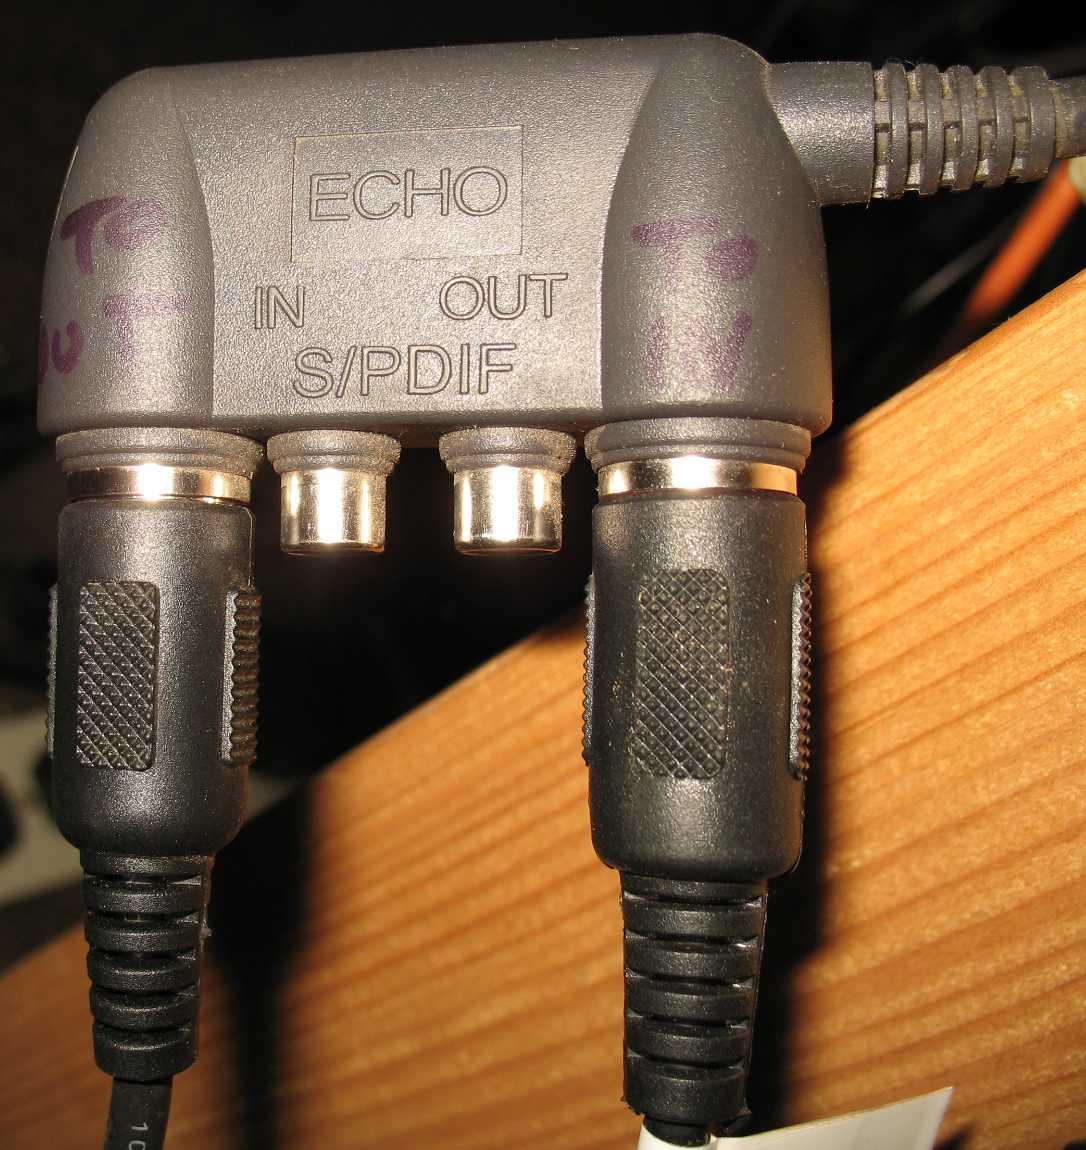 |
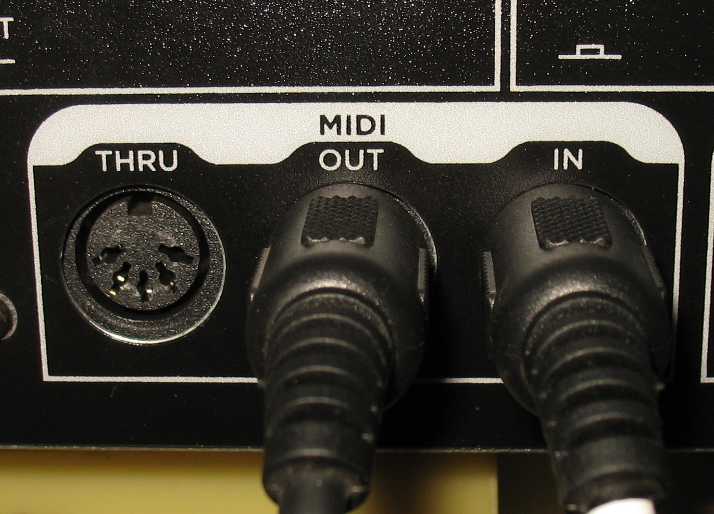
| Step 3: Connect the FCB1010 to your Midi sound card or Midi device You need to have a sound card or some other Midi device installed in your computer that has Midi in and Midi outs You also need two Midi cables Connect the Midi Out on your sound card to the Midi in on the FCB1010 Connect the Midi In on your sound card to the Midi out on the FCB1010 Note: Some of the Kemper Midi functions only work properly when you have two Midi cables connected |
|
| - | |
 Start Ripwerx and choose your Midi input and Midi output devices I am using a Mia Midi sound card as my Midi input and Midi output device After you choose your input device from the list of installed Midi devices, then choose your Midi output device from the list of installed devices If you don't see anything in your list, then you do not have a Midi device installed in your computer Some sound cards may show up on the list that only have internal Midi connections and no external Midi connections In my screen shot above, the Creative MIDI port device is a Soundblaster sound card with no external Midi ins and outs There are pin headers on the Soundblaster card itself that I could connect to external Midi in and Midi out connectors You can buy external devices that plug into your sound card internal connections and have external Midi in and outs The Midisport UNO is a inexpensive USB Midi device that works very well You can also buy inexpensive USB Midi devices like this M-Audio USB Midisport Uno MIDI Interface 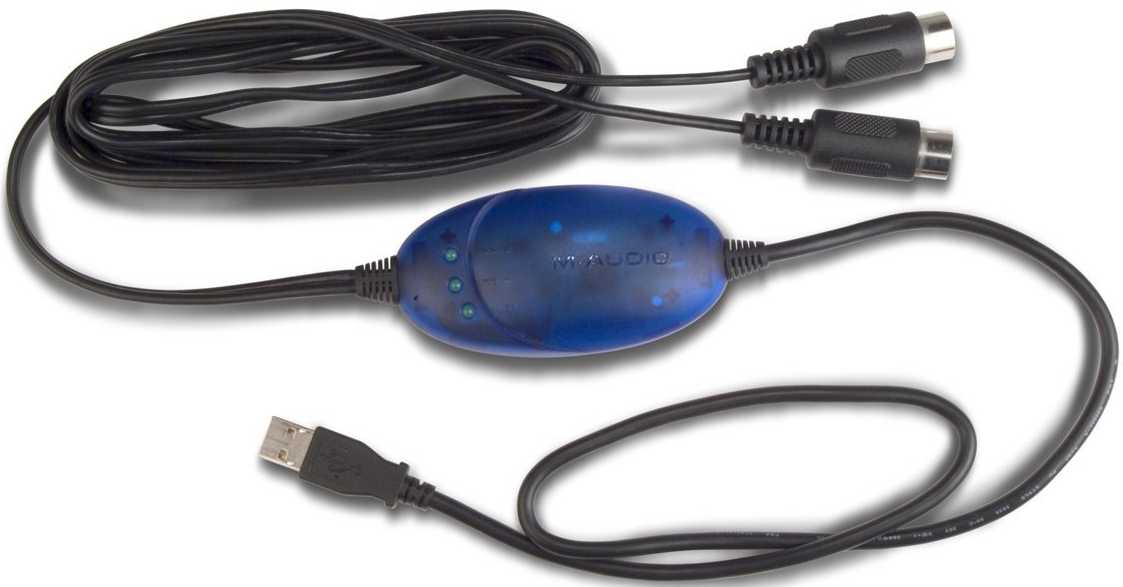 This is a M-Audio USB Midisport Uno MIDI Interface |
|
| - | |
 Now that you have your Midi device connected to your FCB1010 you are ready to start programming it You can open an existing .syx file and edit it or you can do a patch dump from your FCB1010 to Ripwerx A patch dump loads all the settings inside your FCB1010 into Ripwerx Or you can just start with a blank slate and create something from scratch in Ripwerx here's a .syx file you can download as a starting point Kemper - FCB1010 - Ripwerx - SYSEX file link This is the .syx file I am using on this page The screen shot above also shows that you can save a .syx file to your computer or send a patch dump to your FCB1010 The save and send options are not selectable until you have loaded something into Ripwerx Save SYSEX File and Send patch dump are grayed out in my screen shot because I have not loaded anything into Ripwerx yet  This screen shot shows the dialog box you get when loading a patch dump from your FCB1010 into Ripwerx After the patch loads into Ripwerx you get the dialog box shown below Then the Ripwerx Preset tab fills out with all the data that came from your FCB1010 patch dump  |
|
| - | |
| Click on the image below for a larger image. | |
 Set the Preset View options in Ripwerx The big grid that opens up in Ripwerx will have way more columns than we need for this tutorial Click on preset view options and check and uncheck the boxes shown in my screen shot above These are all the columns we will need to program the FCB1010 |
|
| - | |
 Set Ripwerx for stomp box mode In the Global settings tab, check the stomp box mode boxes I have my stomp box pedals set to the upper row, pedals 6 to 10 It will be easier to follow along on this page if you set your stomp box pedals to the upper row |
|
| - | |
| Click on the image below for a larger image. | |
 Now load a .syx file or get a patch dump from your FCB1010 This is what the Ripwerx preset tab looks like once you load a .syx file or receive a patch dump from your FCB1010 You can download this .syx file to use as a starting point Unzip it and open it in Ripwerx Kemper - FCB1010 - Ripwerx -SYSEX file link In the screen shot above, I have filtered out the columns I do not need to see The stomp box settings are at the top of the screen Banks 00 to 18 show up below the stomp boxes I have my stomp box pedals set to the upper row on my FCB1010 which is pedals 6 to 10 on my FCB1010 Notice on the left side of my screen shot that the stomp box pedals are listed as S-6, S-7, S-8, S-9 and S-10 Pedals 1 to 5 are my preset selection pedals on my FCB1010 My preset pedals are listed as this in my screen shot 0-1, 0-2, 0-3, 0-4 and 0-5 for bank 00 1-1, 1-2, 1-3, 1-4 and 1-5 for bank 01 2-1, 2-2, 2-3, 2-4 and 2-5 for bank 02 And it keeps going all the way down to bank 18 So you have 5 preset selection pedals times 19 banks = 95 preset selection pedals total |
|
| - | |
| Click on the image below for a larger image. | |
 I'll explain the Stomp box section first My FCB1010 Stomp box pedals are S-6, S-7, S-8, S-9 and S-10 Columns PRG CHG 1 and PRG CHG 4 are not used for stomp boxes CNT 1 and CNT 2 are where we control what happens when you step on a stomp box pedal EXP A and EXP B are the two expression pedals Midi channel setting You can ignore the numbers under each heading This is the Midi channel that the FCB1010 will transmit on The channel number automatically defaults to channel 1 The Kemper will listen to all 16 Midi channels, so this setting is not critical You can set this to any Midi channel you like if you need to use specific Midi channels Refer to the Kemper manual for more info on Midi channels. Refer to the Kemper Stomp/Effects image down below and the image up above as I explain this section S-6 stomp box pedal is set to send CC 19 with a Value of 127 when it is stepped on the first time CC 19 is Stomp Box C on/off in the Kemper S-7 pedal is set to send CC 24 with a Value of 127 when it is stepped on CC 24 is Effect MOD on/off in the Kemper S-10 pedal is set to send CC 27 with a Value of 127 when it is stepped on S-10 will also send CC 29 with a value of 127 at the same time CC 27 is Delay on/off with spillover in the Kemper CC 27 is Reverb on/off with spillover in the Kemper Notice that I am able to turn Delay and Reverb on and off with one stomp box pedal Pedals S-8 and S-9 are set so that they do not send any CC numbers when they are stepped on I am not using stomp box pedals S-8 and S-9 in this tutorial notice that the Expression pedals are still active for S-8 and S-9 The Expression pedals boxes are checked for all 5 stomp box pedals More info on the expression pedals in the sections below How to make the FCB1010 stomp box pedals toggle switches The check marks to the right of the CC 127 values make the FCB1010 stomp box pedals into toggle switches When you step on a stomp box pedal once it sends the CC number and a value of 127 The effect is turned on in the Kemper and the stomp box pedal LED comes on Any value you send above 0 means on When you step on the same pedal again it sends the CC number and a value of 0 The effect is turned off in the Kemper and the stomp box pedal LED goes out So now you have stomp box pedals that are toggle switches and the LED's on the pedals show the true on/off state If you do not make the stomp box pedals toggle, they will only send on commands That means you can only turn on the effects in the Kemper You would not be able to turn them off with a stomp box pedal on the FCB1010 So make sure you make your FCB1010 stomp box pedals toggle switches Now look at the Kemper Continuous Controllers diagram down below the Stomp/Effects diagram  EXP A is set to 7, which is Volume pedal in the Kemper EXP B is set to 1, which is Wah pedal in the Kemper I will explain the 0 and 127 values for each expression pedal in the sections below |
|
| - | |
 Kemper Stomp/Effects diagram from the Kemper manual Edit CNT 1 and CNT2 to control Kemper effects The numbers in red are the CC numbers you would edit in order to turn on and off effects in the Kemper Use the Kemper chart above for reference In my example, I am using 27 and 29, Delay and Reverb Use any numbers in the Kemper chart above to control the Kemper effects |
|
| - | |
 Kemper Continuous Controller diagram from the Kemper manual The numbers in the Kemper chart above are what you would use to make the expression pedals control different things Note that I have my expression pedals set for Volume pedal 7 and Wah pedal 1  The 0 and 127 numbers to the right of the controller numbers are the value range that the expression pedal will send The info below assumes you have already calibrated your expression pedals See the info further up this page if you have not calibrated your FCB1010 When the expression pedal is all the way off (heal down), it will send a value of 0 When the pedal is all the way on (toe down), it will send a value of 127 All the values in between 0 and 127 get transmitted as the pedal is pushed heel to toe You can set the sweep range of each expression pedal by changing these numbers Lets say that you liked how an effect sounded at the range of 25 to 100 Below 25 was not usable and above 100 was not usable Set the values to 25 and 100 and see how the effect sounds Edit the two values until you have the sweep/range dialed in The image below shows my Wah pedal set for 25 minimum and 100 maximum See the section further down this page about the Ripwerx Midi watch window You can watch what the FCB1010 is sending and dial in your settings better |
|
| - | |
 Editing the FCB1010 preset pedals I edited the image above to only show the sections we need to set up the FCB1010 preset selection pedals PRG CHG 1 is where you set the preset number you want when you step on a preset pedal Check the boxes to make a FCB1010 pedal active and then enter a preset number In my example above, this is bank 00, pedals 1 2,3,4 and 5 When I step on FCB1010 pedal 1, it sends program change 1 to the Kemper Whatever profile you have set to Midi program change 1 in the Kemper will then be called up and active Make sure you check the boxes or nothing will be sent when you step on a preset pedal I already explained how the Expression pedals work further up the page The cool part about editing each preset individually is that you can call up a preset and have the expression pedals do different things for each preset In my example above every preset has a Volume pedal (7) and a Wah pedal (1) In the example below, preset #1 has a volume pedal (7) and a Pitch pedal (4) Preset #2 has a Volume pedal (7) and a Gain pedal (72) Notice that I also set the range on the gain pedal (72) so that the sweep was from 50 to 100  |
|
| - | |
 Editing what the FCB1010 stomp box pedals do when you change a preset The section in red on the right side shows what will happen to each stomp box pedal when you call up a preset Each box represents stomp box pedals 6,7,8,9,and 10 on the FCB1010 A green check means to turn on that stomp box pedal Nothing in the box means to turn off that stomp box pedal nc = No change, do nothing So in the diagram above, starting from the left side Stomp pedal 1 = Turn off Stomp pedal 2 = Turn off Stomp pedal 3 = Do nothing Stomp pedal 4 = Do nothing Stomp pedal 5 = Turn on The LED's on the Stomp box pedals will go on and off also showing the true on/off state of the pedal The reason you want to turn pedals on or off as you change a preset is that you may have turned a pedal on in one preset and do not want it on in another preset So for example, you kicked in a gain pedal in one preset, now you change presets and want that gain pedal turned off The green checks in my example above is stomp box pedal 5 I have this set for Delay and reverb in my FCB1010 and I use that on just about every preset I want Delay and reverb to turn on when I change presets The LED's on the FCB1010 pedals also go on and off when you issue these commands So you can look down and see what stomp box pedals are on or off |
|
| - | |
| Click on the image below for a larger image. | |
 After all your edits are finished, it's time to save your work and download it to the FCB1010  Save a copy of your FCB1010 edits Before you download your edits to the FCB1010, save a copy of your work as a .syx file on your computer It's a good idea to create a folder on your computer and save all your FCB1010 .syx files in a folder you can easily find them You may have different .syx files for Browser mode or performance mode I only cover the Kemper browser mode in this tutorial You may want to make a few test edits and not change your original file You can save the test file as a different name At any rate, always save your .syx files as backup After you have saved your work, continue on to send a patch dump to the FCB1010  Midi Tab - Send Patch Dump to the FCb1010  You should already be connected to the FCB1010 via two Midi cables You get this reminder dialog box - click on OK to continue  If the patch dump went well, you get this dialog box Your patch dump download to the FCB1010 was successful Continue on to set up the Midi in the Kemper |
|
| - | |
| Click on the image below for a larger image. | |
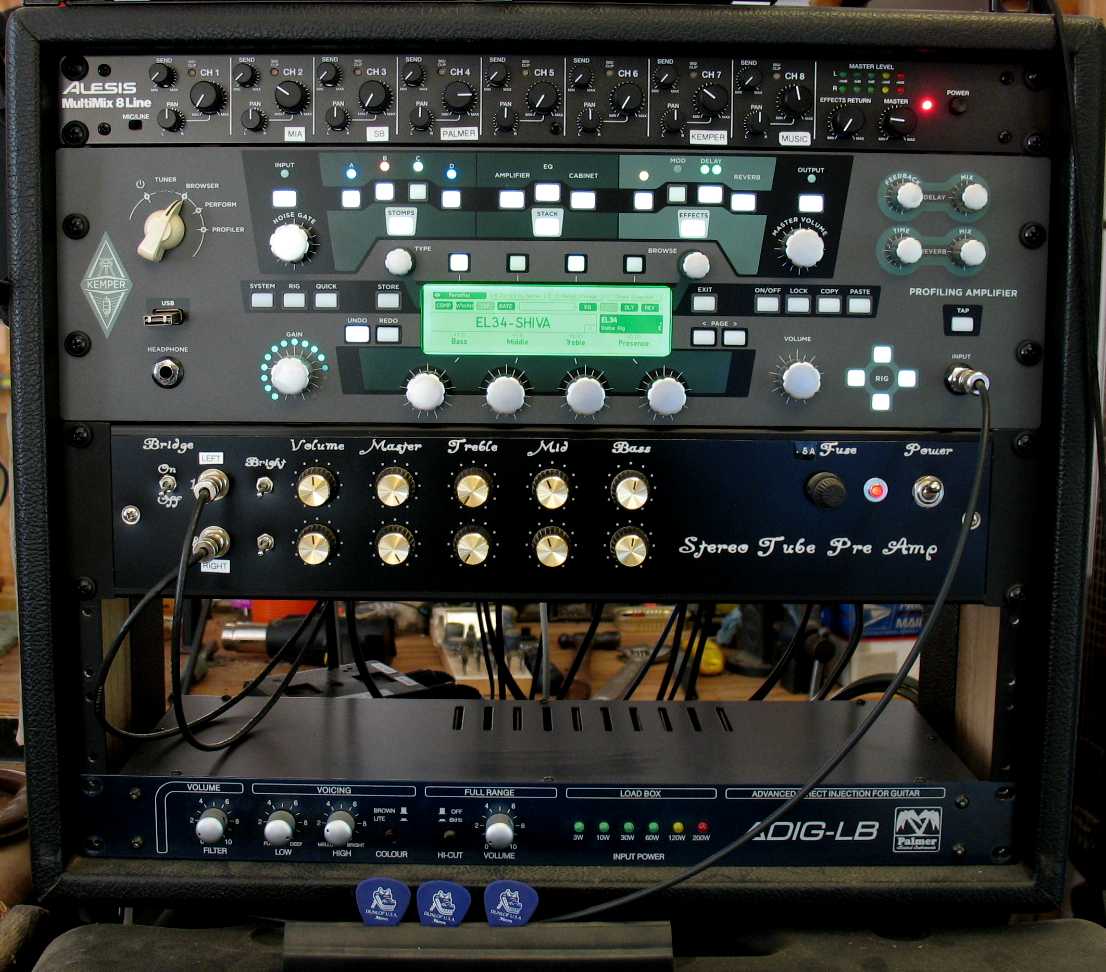
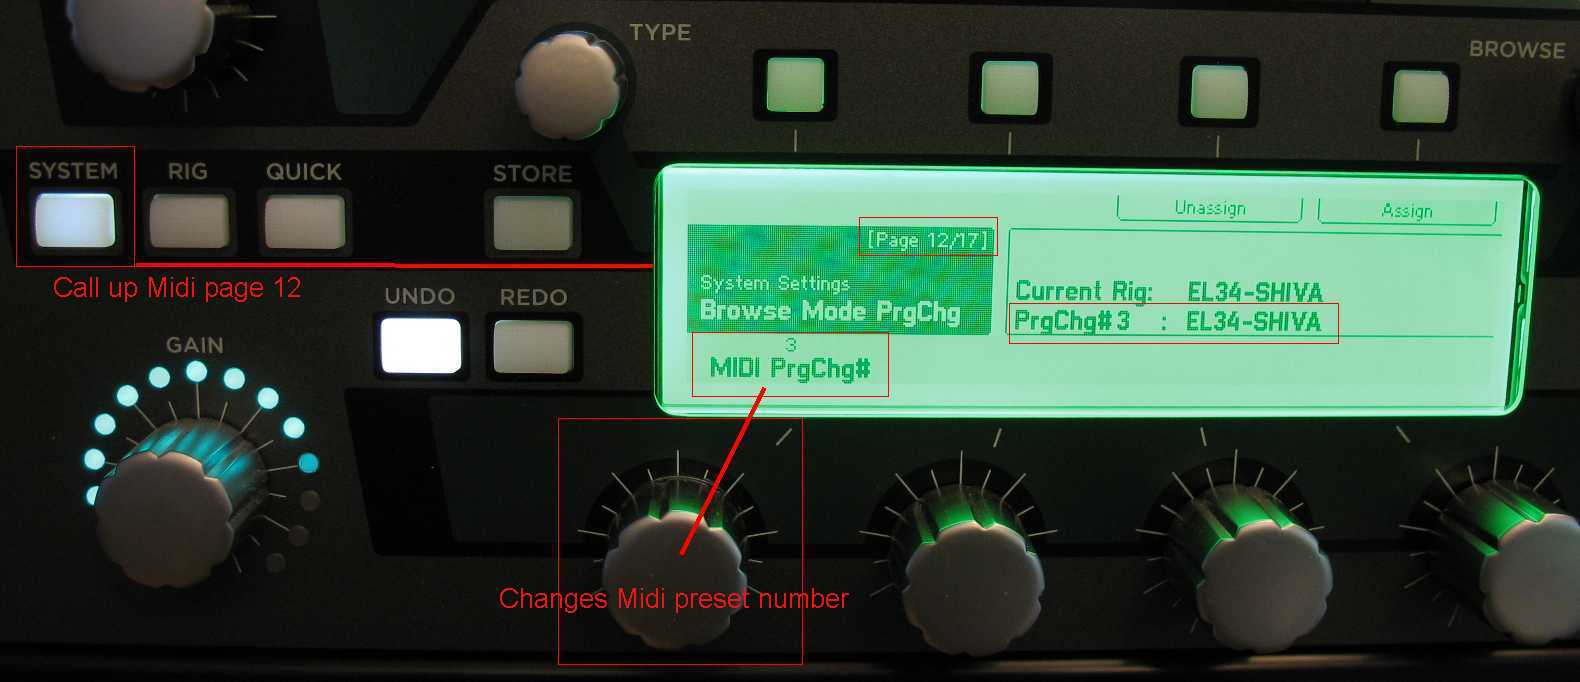 How to set the Midi program change number in the Kemper As you are viewing a profile on the Kemper, press the System button on the left Use the page buttons to go to page 12 Turn the knob shown in the image above to change the Midi Program Change number Press the store button to save your changes You may have to press store twice if the Midi numbers do not save Press the exit button after the Midi program numbers have been saved successfully  Now when you are viewing the profile in the Kemper, the Midi number will show to the right of the profile name In the example above EL34-Shiva profile is assigned to Midi program change 3 When you step on a preset pedal on the FCB1010 that is assigned to program change 3, the Kemper will change to whatever profile is set to program change 3 And all of the stomp box/effects changes you programmed will happen also in the Kemper |
|
| - | |
 After you have down loaded your patch dump to the FCB1010 and you have set up the Midi on the Kemper, you are ready to test the FCB1010 Connect two Midi cables from the FCB1010 to the Kemper and test the stomp box pedals and preset pedals To re-edit your FCB1010, go to Ripwerx and load a saved .syx file or get a patch dump from your FCB1010 Go back up this page for editing instructions in Ripwerx |
|
| - | |
Kemper profiling amp notes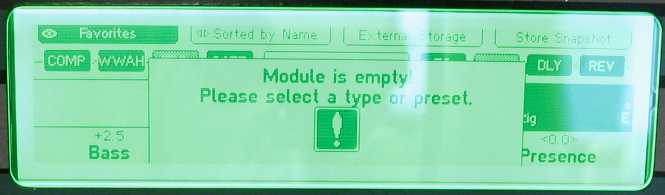 If you change a preset and tell the Kemper to turn on a stomp box or an effect and nothing is loaded into that slot, you will see this error message It will go away after a couple seconds In the example above, I sent a command to turn off MOD, the effect slot to the left of delay There was nothing loaded into that slot and so I got the error message 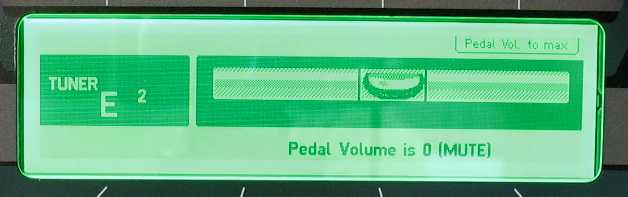 How to get the Kemper tuner to automatically display Here's a neat trick that the Kemper can do When the FCB1010 volume pedal value goes to 0 (heal down), the tuner automatically displays on the Kemper So if you have one of the expression pedals set up as a volume pedal, you can make the tuner appear when you go heal down Note: Some of the Kemper Midi functions only work properly when you have two Midi cables connected |
|
| - | |
Ripwerx Notes: Use the Ripwerx Midi watch window to see what Midi commands your FCB1010 is sending  In this example, I stepped on preset pedal 1 on the FCB1010 The FCB1010 sent program change 001 It also sent all my stomp box commands and the values at the same time The LED's on the stomp box pedals turned on or off according to what I programmed This is what happened in the Kemper The Kemper switched to the profile that was assigned to Midi program change 1 CC 19 was switched off CC24 was switched off CC 27 was switched on CC 29 was switched on  In this example, I stepped on Stomp box pedal 6 on my FCB1010 You can see that the FCB1010 sent CC 19 value 127 This turned on Stomp C in the Kemper The LED on FCB1010 stomp box pedal 6 lit up  In this example, I stepped on Stomp box pedal 6 again The FCB1010 sent CC 19 value 0 This turned off Stomp C in the Kemper The LED on FCB1010 stomp box pedal 6 turned off Click on the image below for a larger image.  How to step through profiles - down one profile or up one profile at a time Look at bank 18 - Pedals 18-1 and 18-2 The PRG CHG 1 check boxes are unchecked 18-1 is sending a CC number of 49 and a value of 0 18-2 is sending a CC number of 48 and a value of 0 CC 49 value 0 = Go down one profile in the Kemper CC 48 value 0 = Go up one profile in the Kemper This will step up or down one profile at a time in the Kemper Hoe to Control the Kemper Gain knob with an expression pedal Notice that EXP B has been set to 72 for 18-1 through 18-5 a value of 72 controls the Gain knob in the Kemper Also notice that the Stomps on the far right are all set to nc If set any of the stomps on the far right are set to on or off, the stomp box settings at the top will override the Expression pedals settings when you step on 18-1 or 18-2 So the stomps for 18-1 and 18-2 are set to nc = no change No change will not trigger a stomp box setting If you did not set these to nc, EXP B would still be set as a 1, which is a Wah pedal As it is, EXP B will be set to 72, which is the Kemper gain knob |
|
| - | |
| Click on the image below for a larger image. | |
 |
|
| - | |
Enter My Tube Amp Parts Store Here
Mobile users Enter My Tube Amp Parts Store Here
The Tube amp Library of information
Click the link above for Tube amp info, Schematics, Board building information, Projects, Mods, Transformer diagrams, Photo's, Sound clips.
There are hundreds of pages of Tube amp information on my library page.
Please visit my Tube Amplifier Forum
Here's the place you can go to ask tube amplifier questions.
You will find a large community of friendly amp builders at the link above.
Check the huge library of Schematics here
Design your own custom Turret Board or Eyelet board
DIY Layout Creator file analyzer program
DIY Layout Creator file library
How to email me
|
MEMBER OF PROJECT HONEY POT Spam Harvester Protection Network provided by Unspam |