
Super PID motor Control |
|
The Super PID is a fancy motor speed controller that uses a sensor to sense how fast the motor is spinning The motor speed can be set manually with a pot or can be controlled from mach3 with G-Code The motor can be turned on and off manually or controlled from Mach3 with G-code There are some big pluses to having a Super PID I now can run the Bosch Colt router at very low speeds and have the speed stay constant Another big plus is that now the router runs so much quieter than before. Running at 15K, I don't even need ear protection The cuts are way smoother now because the bits are running at a constant speed |
| Click on the images to see a larger image |
 |
|
I have my Super PID mounted on top of my Y axis The power to the router and the sensor wire move up and down when the Z axis does This mounting has worked out really well |
 |
|
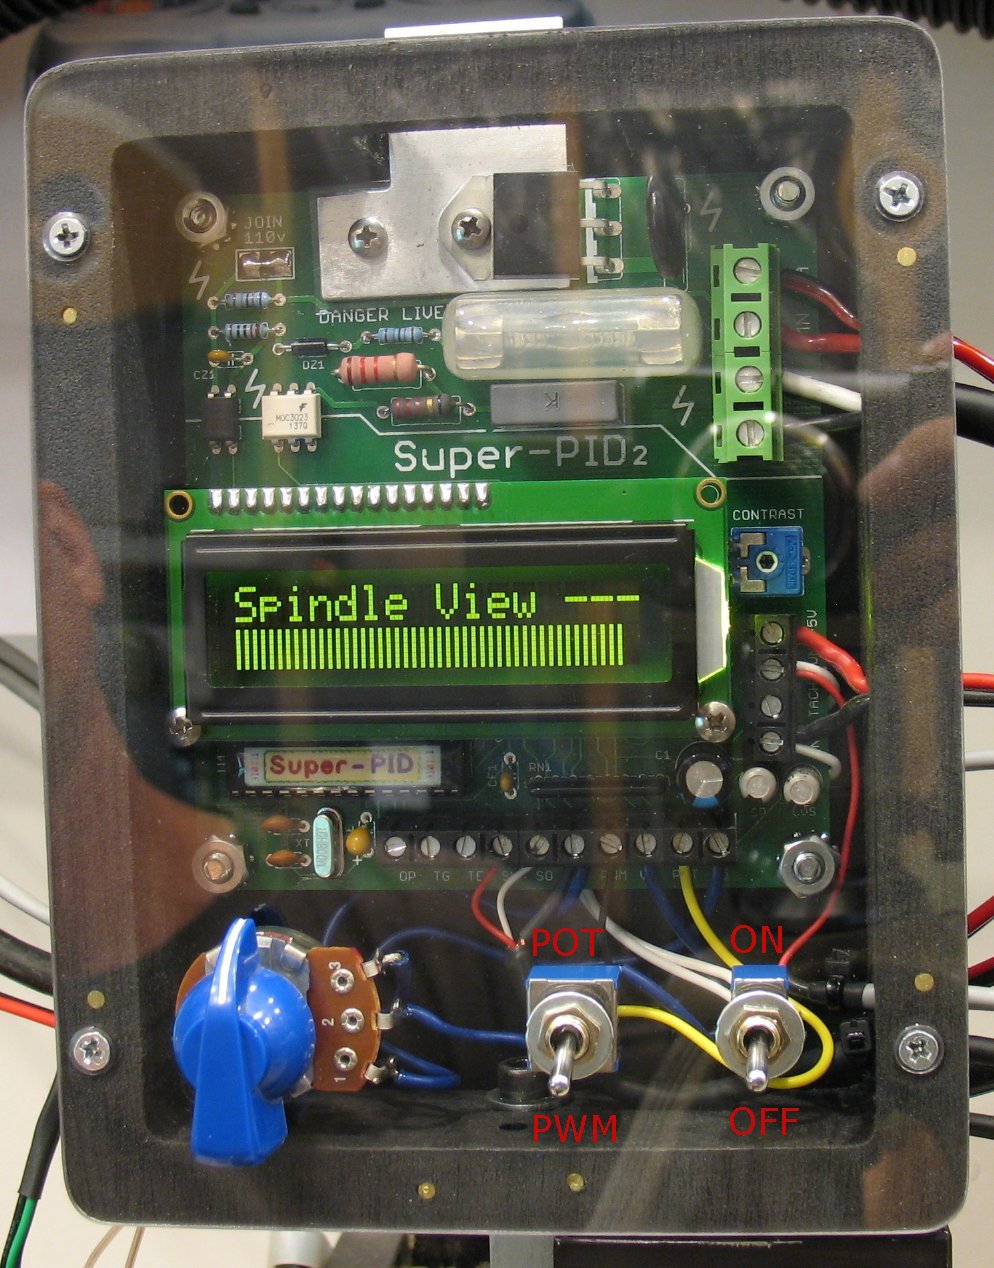
The Super PID circuit board is inside a box that I machined from black HDPE plastic The clear cover is Lexan I have since added labels to the switches with a Rotex label gun The pot can control the motor speed manually when the switch is set to POT When the switch is set to PWM, Mach 3 controls the motor speed with G-code The ON/OFF switch can turn the motor on and off manually. Or, Mach3 can control the motor on and off with G-Code |
| - |
 |
|
You have to install a speed sensor on the router so that Super PID can detect what the current motor speed is The sensor detects a Light and Dark area on the motor shaft. If the router speed slows down under a heavy cutting load, the super PID will increase the motor speed to keep it constant. I soldered a piece of round brass tubing to a flat brass plate The sensor is Pushed down into the brass tube and is just a few millimeters above the Black and White area on the motor shaft I used a dab of clear silicon RTV to glue the sensor into the brass tube and to keep dust out I added some heat shrink tubing to the sensor wire to make it thicker and to give it some strain relief. The black screw is the stock cover screw for the Bosch Colt I drilled an over sized hole in the blue plastic housing that is off center This way you can move the sensor around a bit and find the best spot and then lock it down with the screw  As you manually rotate the motor shaft the Super PID will show you the strength of the sensor reading Rotate the motor shaft so the sensor is reading the white area on the motor shaft You want to get the green bars as high to the right as possible when the sensor is reading the White area on the shaft Then you rotate the motor shaft to the black area You want the green bars as low as possible Lock the sensor down when you find the best spot |
| - |
 |
|
Here you can see the end of the motor shaft is painted Black and White The sensor is positioned a bit off the center of the shaft so it gets a clear picture of the Black and White area as the shaft is spinning The blue plastic housing had to be trimmed to be able to see the end of the motor shaft. I trimmed a big round hole with a Dremel tool rasp bit. You could also drill the hole out if your drill can accept a large bit You have to take the router apart and remove the blue plastic housing to be able to do this The big blue square cap you see in the picture above is the rear bearing support My housing had two spring washers behind the bearing These washers push the bearing down and keep the shaft from bobbing up and down In the picture above you are looking at the motor shaft and part of the pressed on rear motor bearing. The bearing fits snug in the blue plastic housing, but you can pull it apart easily. Take out the brushes first before you disassemble the router |
| - |
 |
|
Here's the Bosch Colt wiring diagram with the switch and speed control disconnected You have to get rid of the variable speed control in the Bosch Colt to be able to use the Super PID I also disconnected the red power switch because it is a wimpy little switch and is a weak point. You want the wiring to be solid and direct to the motor brushes to get the most power. I soldered and heat shrinked my connections There's no need for a power switch if you have Emergency stop on your CNC You can also stop the router on the Mach3 screen or with the keyboard I left the power switch in the housing just to block dust, but it does nothing I also removed the big bulky Bosch Colt power cord I only needed a 3 foot long cord that goes from the Super PID to the router I used some super flexible 18 gauge zip cord That cord is Red and Black in the picture up above. |
| - |
Enter My Tube Amp Parts Store Here
Mobile users Enter My Tube Amp Parts Store Here
The Tube amp Library of information
Click the link above for Tube amp info, Schematics, Board building information, Projects, Mods, Transformer diagrams, Photo's, Sound clips.
There are hundreds of pages of Tube amp information on my library page.
Please visit my Tube Amplifier Forum
Here's the place you can go to ask tube amplifier questions.
You will find a large community of friendly amp builders at the link above.
Check the huge library of Schematics here
Design your own custom Turret Board or Eyelet board
DIY Layout Creator file analyzer program
DIY Layout Creator file library
How to email me
|
MEMBER OF PROJECT HONEY POT Spam Harvester Protection Network provided by Unspam |