
| Back to Library page |
Hoffman Blues Junior Tube Board |
|
This is the assembly instruction for my Blues Junior replacement tube board The boards used in this build can be found on these pages Hoffman amps Turret board catalog page Blues Junior tube board Kits-parts list page |
| Click on the images to see a larger image |
 |
|
This is my CNC made Blues Junior replacement tube board There are 3 .75 inch diameter holes for 9 pin pre amp tube sockets There are two 7/8ths inch holes for the power tube sockets The power tube sockets use a over the top spring clip to hold the EL84's in their sockets There are 3 eyelets at the right end for filament connections Use the center eyelet for 47 ohm artificial center tap resistors if you are not using the stock resistor on the PC board The center eyelet will get connected to chassis ground if you use the 47 ohm resistors Tech Tips: Now is a great time to remove the PC board and install a bias pot The board is not that difficult to remove You have to unplug several wires and remove some screws I have seen burnt traces and loose solder joints on Blues juniors Check all solder joints on the back of the PC board. I have seen open screen grid resistors because they are way undersized Replace the way too small 1/2 watt 100 ohm screen grid resistors with 3 watt 100ohm resistors Make sure you look at my Blues Junior build page here My Blues Junior Turret board build page |
| - |
| Click on the images to see a larger image |
 |
| Backside shot with the tube sockets installed Use 4/40 x 1/4 inch screws and #4 Keps nuts to installed the sockets Look at my photo above and note how I have arranged the sockets On the pre amp sockets, the gap between pin 1 and pin 9 is at the bottom This aligns pins 1-2-3 and 6-7-8 on a nice horizontal plane The power tube sockets can be mounted any way you like but I find it better to have the pin gap pointing up |
| Click on the images to see a larger image |
|
|
|
Front side shot with the tube sockets installed |
| - |
| Click on the images to see a larger image |
 |
|
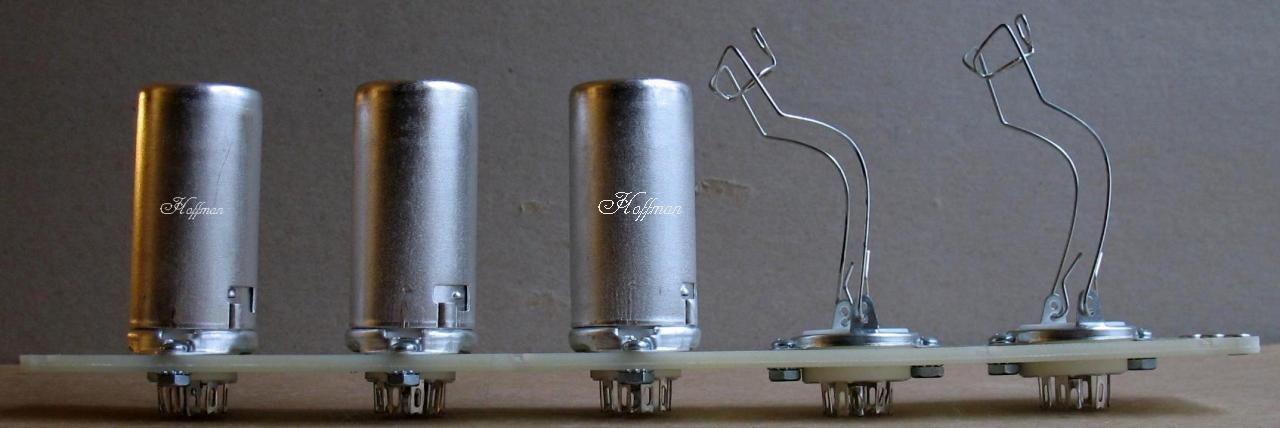
Side shot with the tube sockets installed |
| - |
| Click on the images to see a larger image |
 |
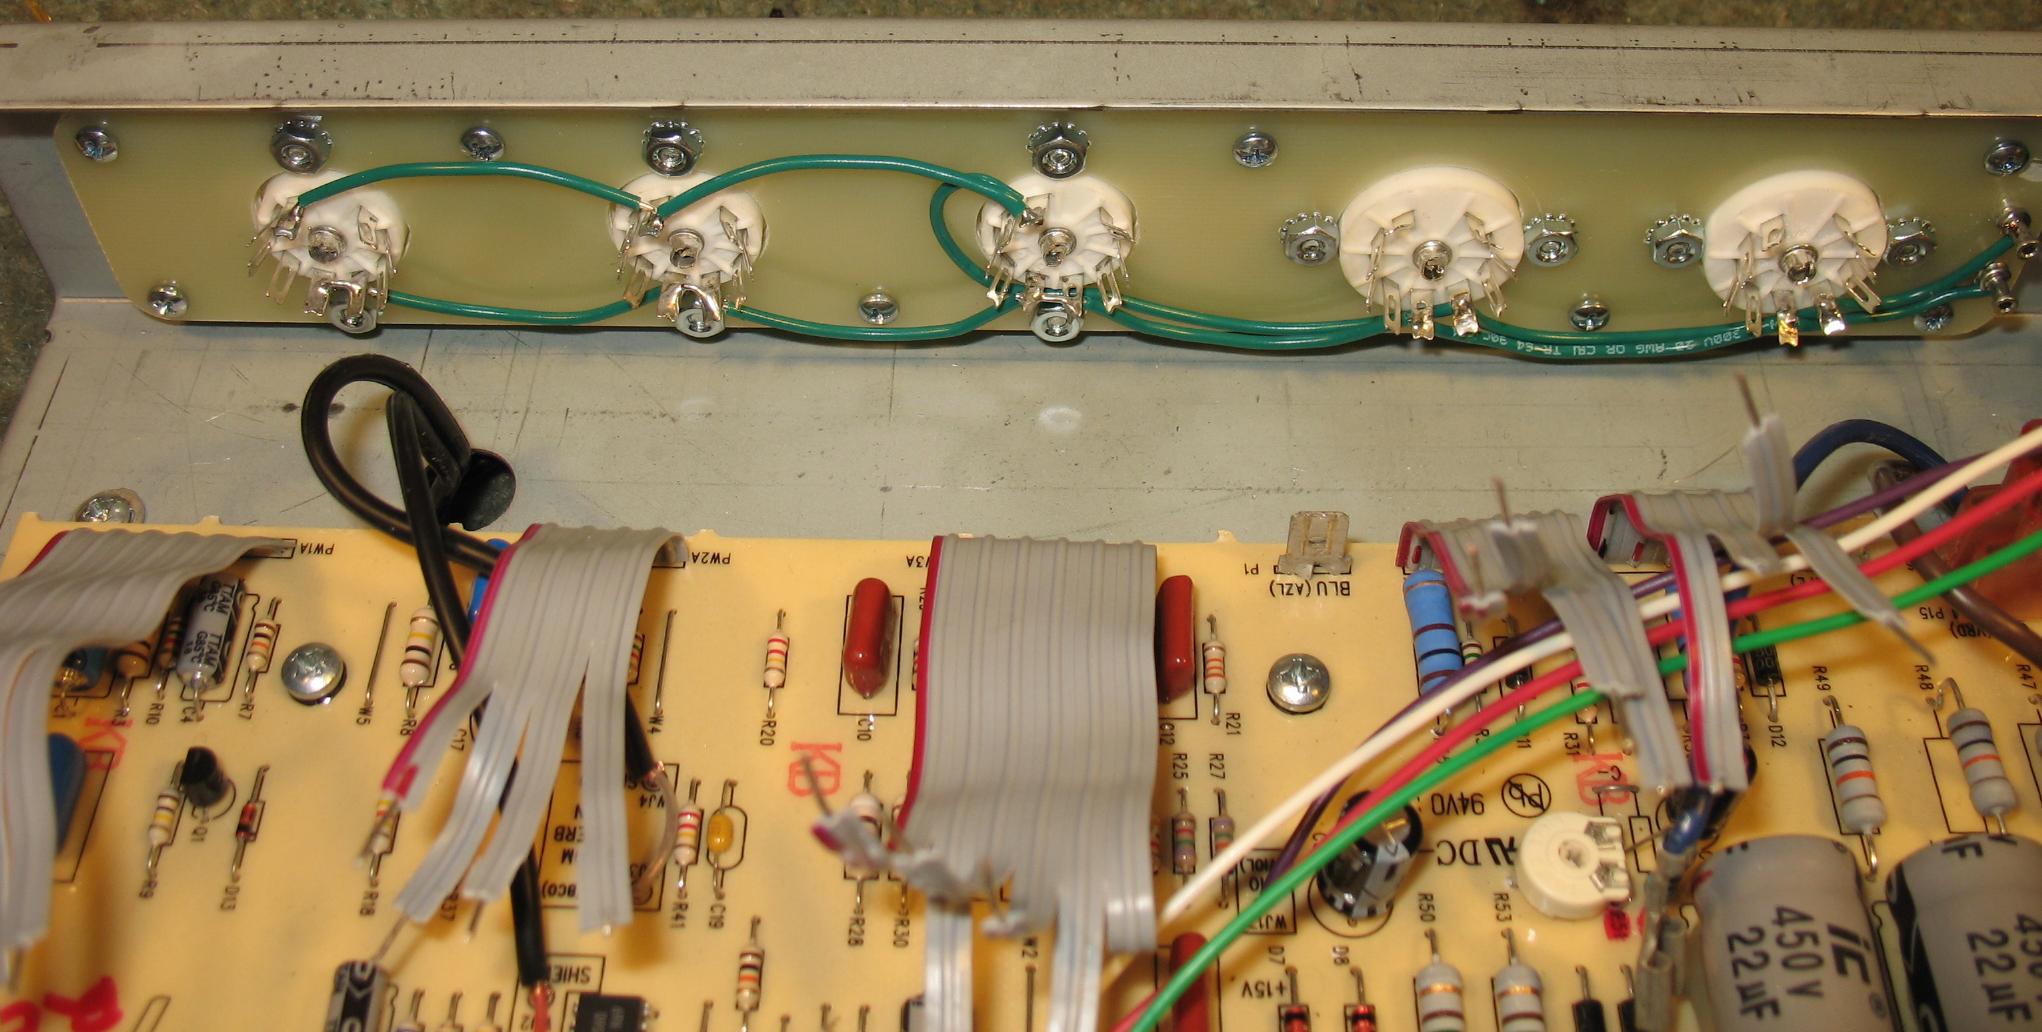
| The tube sockets have been wired up for the 6.3vac filaments Pre amp tubes use pins 4-5 connected together and 9 El84's use pin 4 and pin 5 Some people seem to be concerned that the filament wire are not run as a twisted pair. If you run your filament wires the same way as you see in my picture above, you will not have any hums issues The Blues Junior amps I have done so far have zero hum and so I know this wiring works perfectly. |
| - |
| Click on the images to see a larger image |
 |
|
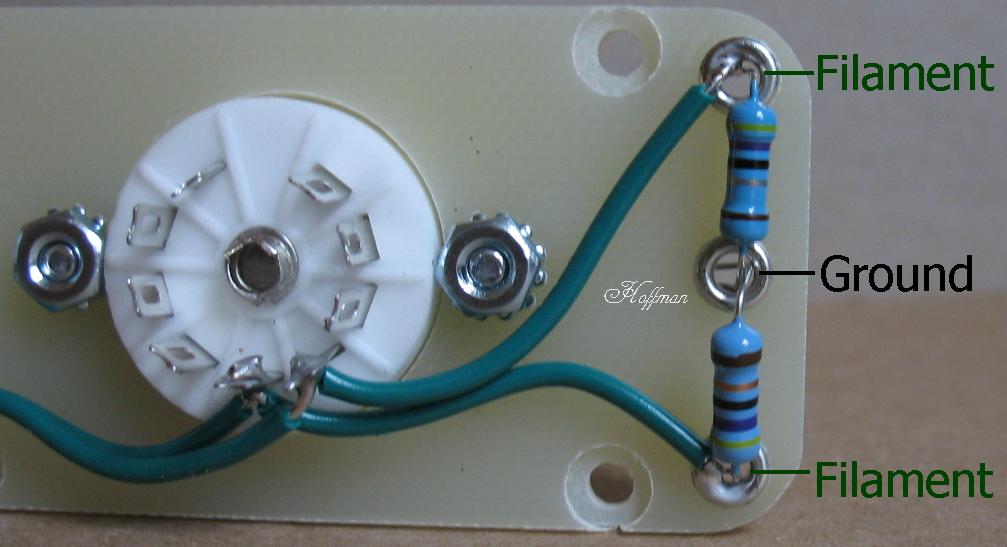
These resistors are the artificial center tap for the Filaments If you are installing a Hoffman Turret board in the amp, you need to use these resistors You only use these two 47 ohm resistors like this if you are not using the stock resistors on the main PC board. If you are just replacing the tube board only, you do not need these resistors There are two green wires on the main PC board that get attached to the filament eyelets If you are using the two 47 ohm resistors on my BJ tube board, the ground can go to a power tranny bolt See the pictures of my BJ Conversion here for more info |
| - |
| Click on the images to see a larger image |
 |
|
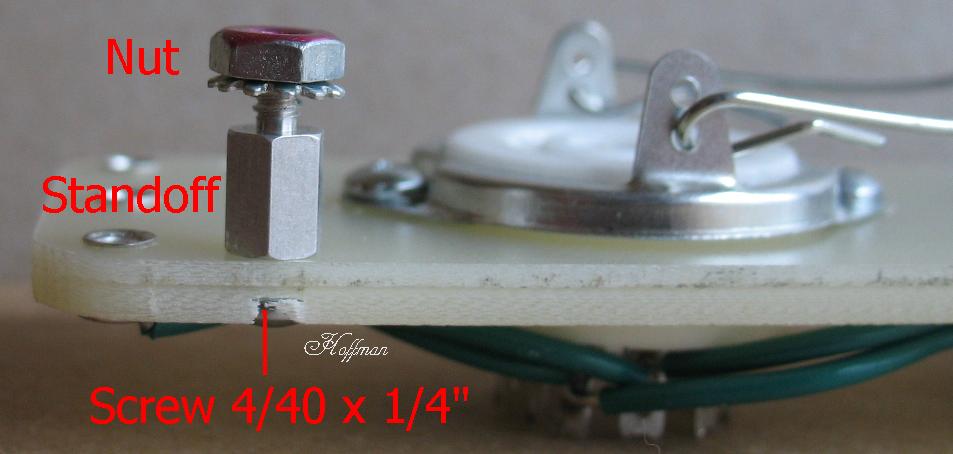
This is how you install the mounting hardware The replacement Tube board has recessed holes because 4/40 x 1/4 inch screws are not long enough and 4/40 x 3/8 inch screws are too long 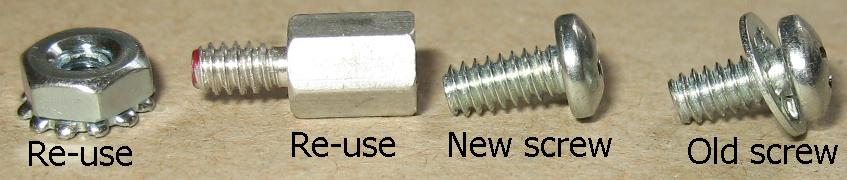 The stock screws that you removed from the blues junior cannot be used because they have a lock washer attached to them that does not come off. And the lock washer diameter is too wide to fit down into the board recess If you can find some way to remove the lock washer, you can re-use the stock screws You need quantity 8 of 4/40 x 1/4 inch screws to mount the tube sockets The stock aluminum standoffs can be re-used and the stock 4/40 Keps nuts can be re-used The 4/40 screw attaches to the female threads on the standoff The standoff has male threads on the other end that go through the chassis holes Then you use a 4/40 Keps nut to secure the standoff to the chassis Important: Be careful not to crank down on the screws and nuts too much It is very easy to strip the aluminum female threads and break off the male threads You do not need to tighten the screws and nuts down like you would with steels bolts and nuts Use some Loctite on the threads if you want to make sure they do not come loose |
| - |
| Click on the images to see a larger image |
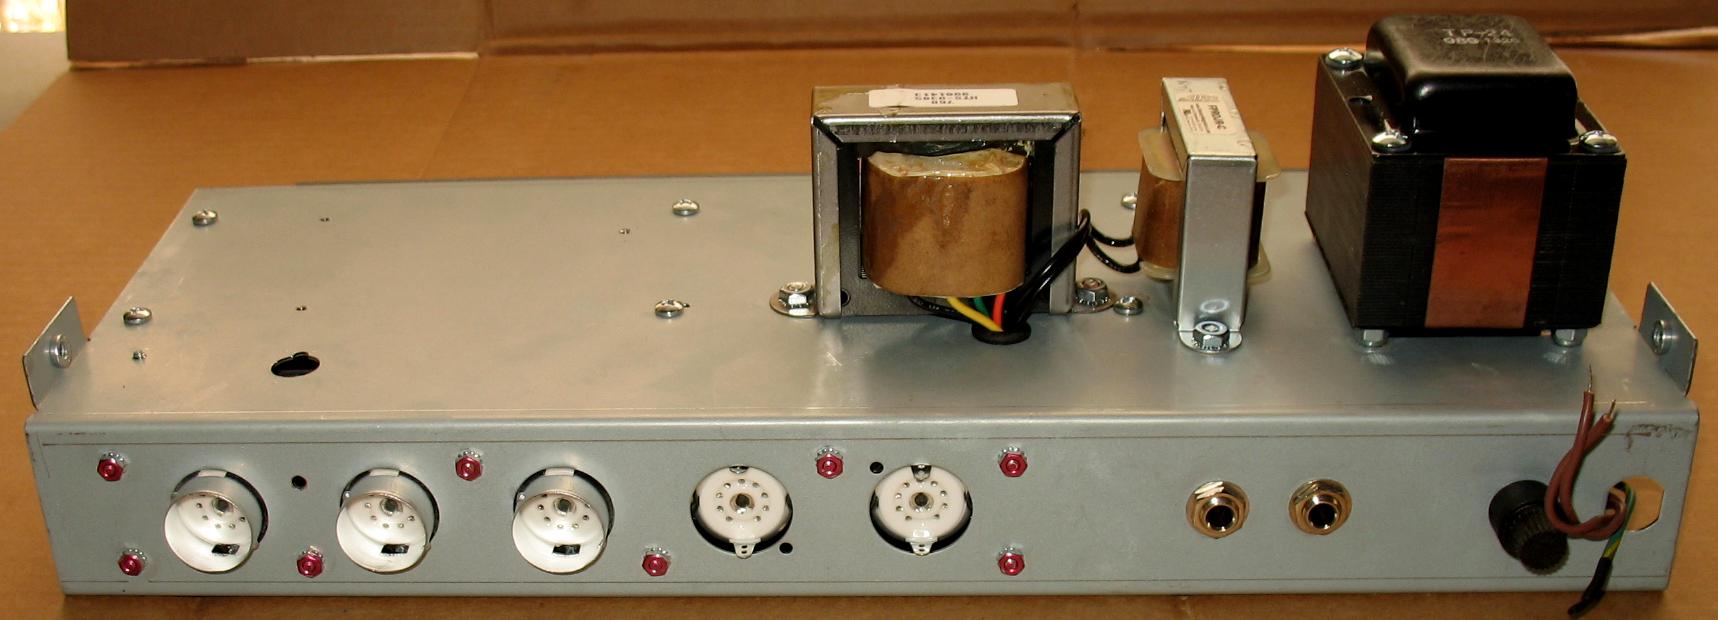 |
| This is what the Blues Junior tube board looks like when it is mounted in the chassis The pre-amp tube sockets stick through the chassis holes and you can now use a tube shield Remove the power tube springs when installing the board and hook them up again after the board is in place If the standoff studs do not line up perfectly with the chassis holes, you can take a drill and enlarge the chassis holes slightly If you have removed the main PC board, you can leave the 4/40 x 1/4 inch screws a bit loose You can then install the tube board and tighten down the Keps nuts Then reach inside the chassis and tighten down the 4/40 x 1/4 inch screws |
| - |
| Click on the images to see a larger image |
 |
|
Here's a shot of the original pc tube board. It's too thin and the copper traces are too wimpy Many of these maps have burned up tube boards. Fender does not have a bias pot on these amps and the bias is set way underbiased Some people report that the amps are running 45 milliamps of current per EL84 I like to set the bias at 25 milliamps after installing a bias pot |
| - |
| Click on the images to see a larger image |
 |
|
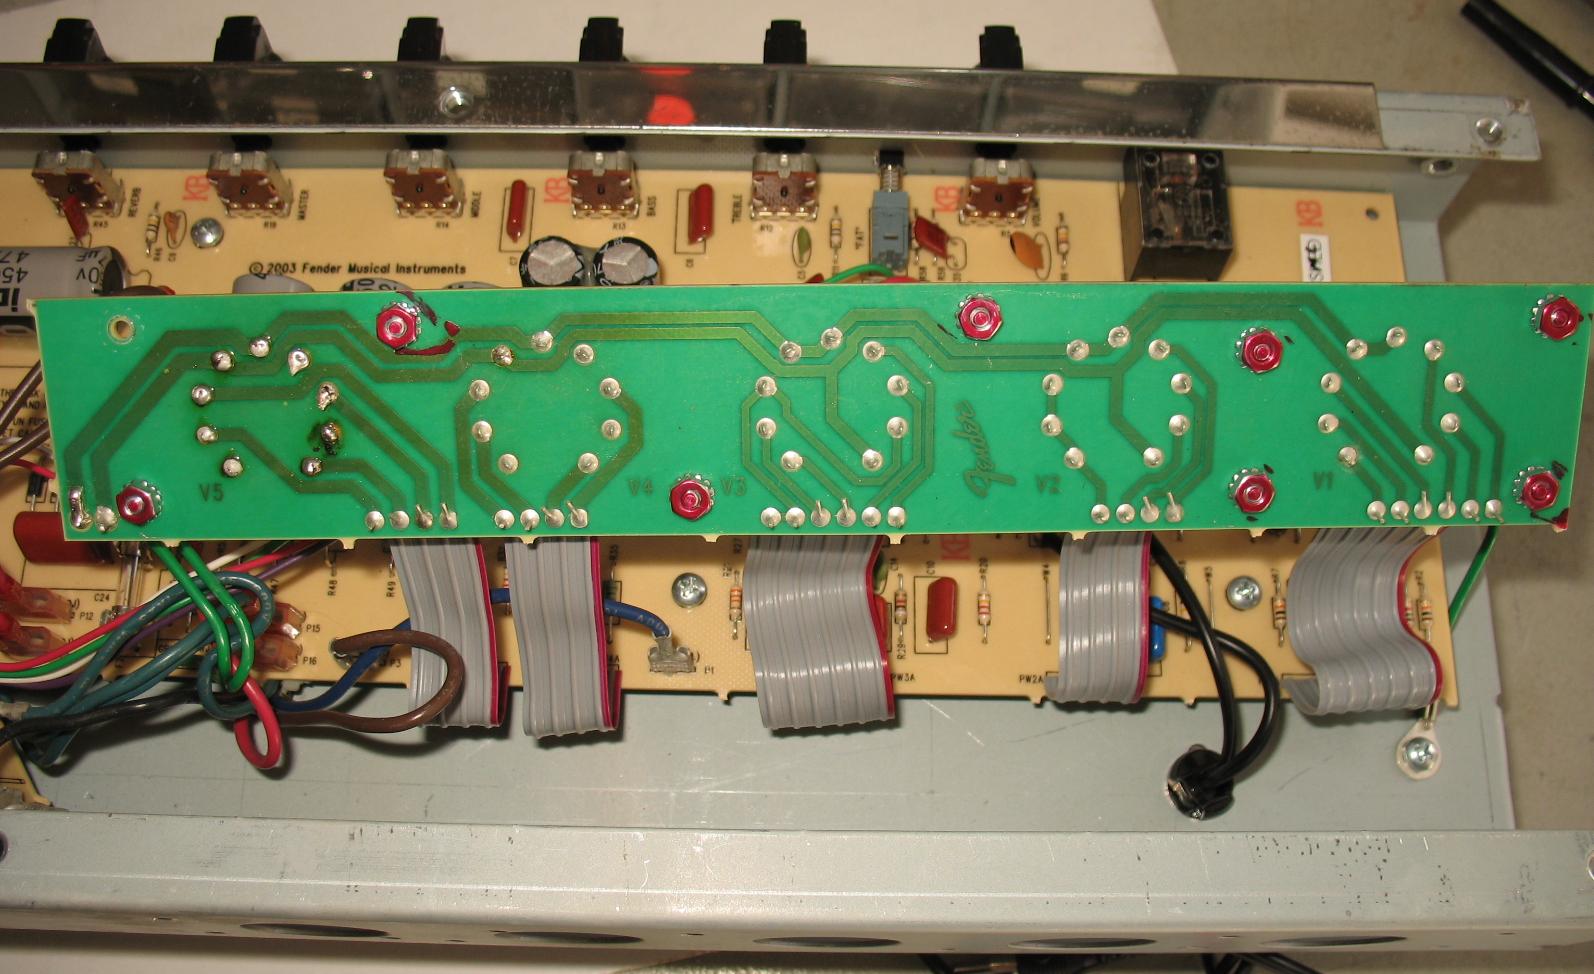
Important: Before you cut off the pc tube board, use a multi meter to figure out where each wire in the ribbon cable is going Double check with a meter to make sure the ribbon cable connections are the same as in my diagram down below Cut the ribbon cables flush at the old tube board If you look at the ribbon cable closely, you can see there are perforations between each wire You can snip the perforations and then the wires will peel apart and become individual wires Go ahead and peel them apart almost all the way down to the main board Stop peeling about 1/2 inch from the main boards the ribbon cable is still joined toether It helps to keep the ribbon cable more solid |
| - |
| Click on the images to see a larger image |
 |
|
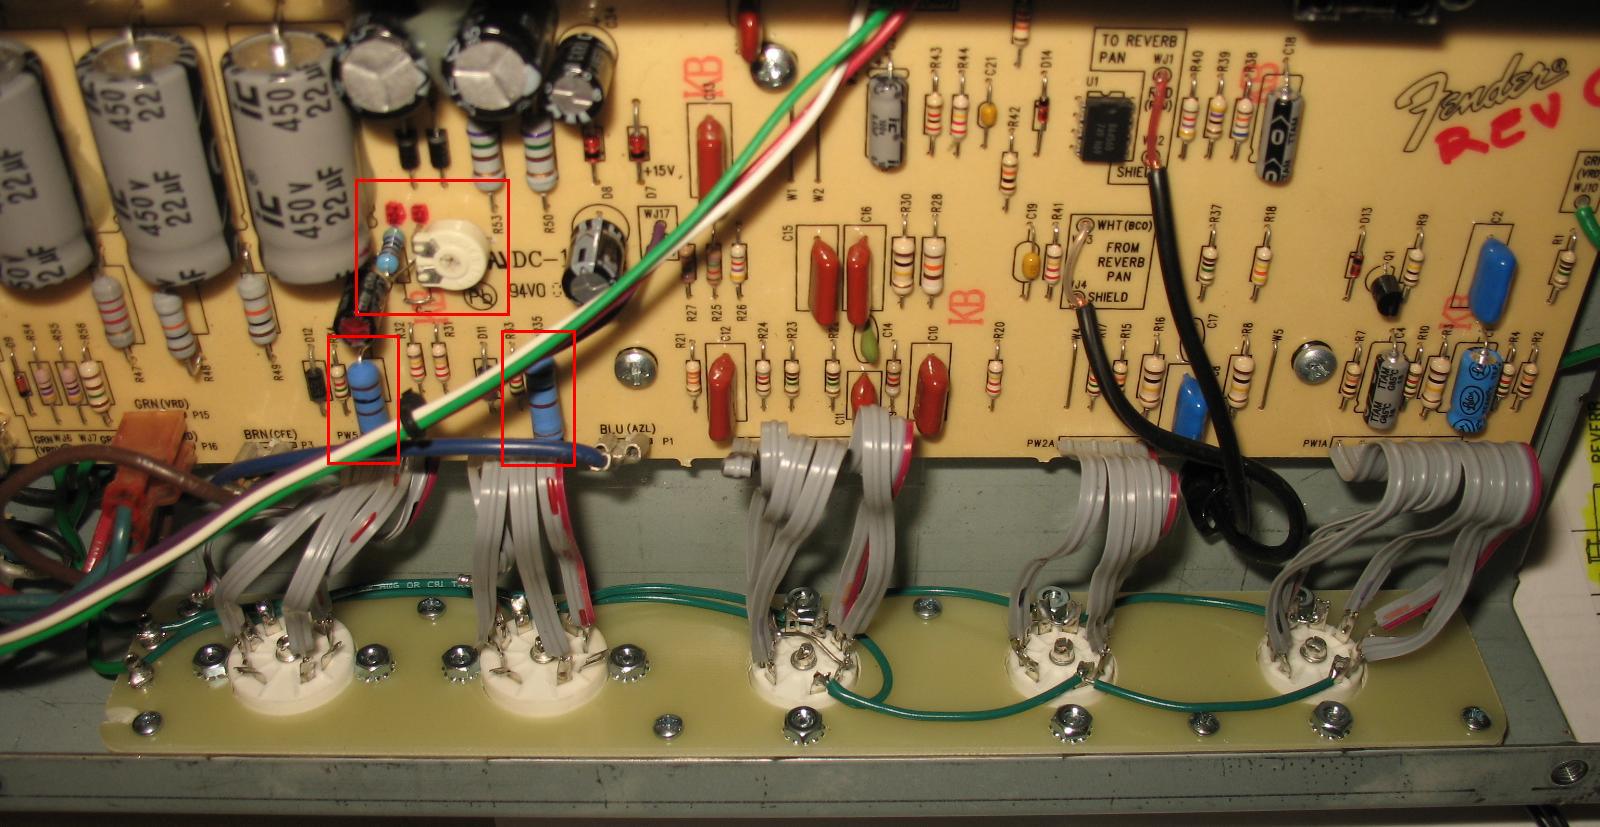
Here's the most difficult part, wiring up each wire to the tube sockets The wires strip pretty easy See my wiring diagram below In the image above the red squares are where I added a bias pot and changed the 100 ohm screen grid resistors If you are also installing a Hoffman Blues Junior Turret board, you will not wire the tube sockets up like this You will be wiring them point to point from the Turret board to the tube sockets The installation info for the BJ turret board is on this page |
| - |
| Click on the images to see a larger image |

|
|
Tube socket pin wiring diagram Note that on a stock Blues Junior, only 1/2 of V2 is used The ground wire connection on V2 was used to ground out pins 1,2 and 3 to shut that tube half off If you are only using one half of V2, you will have to use the connection marked ground Jumper the pins on the unused half and run a wire to the PC board ground connection That ground connection is shown in the image above Where the V2 ribbon cable was attached to the PC board It does not matter which tube half you use Pins 1, 2 and 3 are one half Pins 6, 7 and 8 are the other half Just make sure to ground out the unused half MOD - You can actually parallel the connections on V2 to get a stronger signal push To do this, run insulated jumper wires on the back of the tube socket Pins 1 and 6 get tied together Pins 2 and 7 get tied together Pins 3 and 8 get tied together The jumpers should look like this 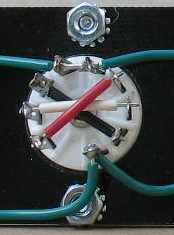 Take your time and wire everything correctly Install the tubes Set the bias pot so you have maximum negative voltage on pins 2 of the EL84 sockets Fire up the amp and set the bias to 25 milliamps The amp will now run way cooler and hopefully nothing else breaks on the PC board If you want to go all the way, you can install the Hoffman Blues Junior Turret board and get rid of the PC board More info can be found on this page about that the Hoffman Blues Junior turret board |
| - |
Enter My Tube Amp Parts Store Here
Mobile users Enter My Tube Amp Parts Store Here
The Tube amp Library of information
Click the link above for Tube amp info, Schematics, Board building information, Projects, Mods, Transformer diagrams, Photo's, Sound clips.
There are hundreds of pages of Tube amp information on my library page.
Please visit my Tube Amplifier Forum
Here's the place you can go to ask tube amplifier questions.
You will find a large community of friendly amp builders at the link above.
Check the huge library of Schematics here
Design your own custom Turret Board or Eyelet board
DIY Layout Creator file analyzer program
DIY Layout Creator file library
How to email me
|
MEMBER OF PROJECT HONEY POT Spam Harvester Protection Network provided by Unspam |